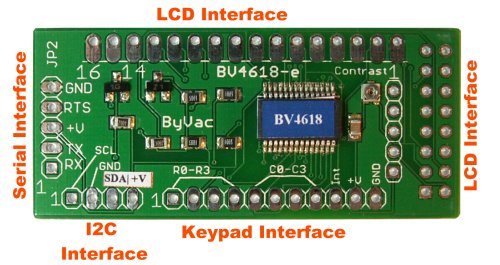
BV4618 KIT - Comes with pcb , LCD , Keypad

The BV4618 is an LCD charter display controller that will attach to LCD displays with a HD44780 controller or similar. It has 3 interface options, RS232, Serial and I2C and also has provision for attaching a 4x4 keypad. The controller will take care of scrolling at the end of the line and also at the bottom of the display.
Differences between BV4618 andBV4619
BV4618
3 serial interfaces, includes RS232 12V levels
Works like a VT100 display
Only one device per serial bus
One back light out put on or off | BV4619
2 serial interfaces no 12V levels
Direct LCD commands, simpler user takes care of scrolling
Addressable protocol, many devices on one serial bus
3 back light outputs, PWM dimmable |
Arduino
See the Arduino Library: Arduino Library(Arduino version 1.01)
New contribution from Jean-Claude BV4618_Due.zip
Instructions
Place the following 2 libraries in the same directory named bv4618Due_I
bv4618Due_I.h 2,816 KB of 29/05/2018
bv4618Due_I.cpp 12 524 KB of 29/05/2018
The directory bv4618Due_I should be placed in the subdirectory c: program Files (x86) Arduino Librairies
If you have installed previous versions of these files, make sure to delete them everywhere on your computer. Some of them could have been placed in different location (eg. C:usersxxxdocuments). The Arduino code can be placed in any directory on the computer.
With these 3 files, the LCD works. Nevertheless, it still remains 3 minor problems.
1 – When you download the Arduino code into the DUE card, LCD displays the message right away. If you disconnect the USB cable, and you reconnect it, you have to press the reset button to make it work.
2 – Because of the di.cls instruction (line 30) the LCD blinks weakly at the rate of the delay parameter (line 40)
3 – The delay of 1500 ms could interfere with the main code in which the LCD code is included.
Raspberry Pi (I2C)
The BV4618 is an LCD charter display controller that will attach to LCD displays with a HD44780 controller or similar. It has 3 interface options, RS232, Serial and I2C and also has provision for attaching a 4x4 keypad. This is a demonstration of how to use the device using the I2C interface. Further information on interfacing with the RPI
Simple test for RPi and I2C interface. Download this zip file and extract to the RPi. In a terminal type:
python i2ctest.py
This will display 2 lines of text on a 16 x 2 diplays
Browser
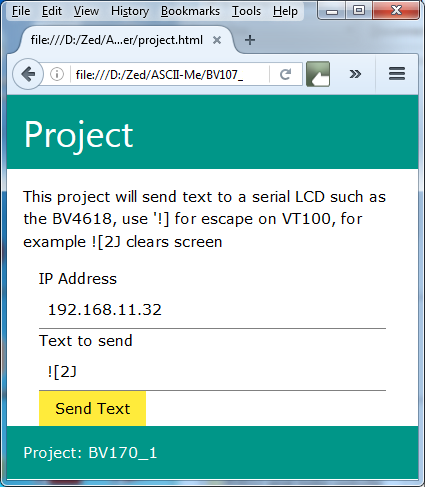
This is a project originally intended for the BV107_1 which is a wifi to Serial converter. Because this is a serial device it works well here and can be used on a Desktop or Smartphone.
http://www.byvac.com//downloads/BV4618/project.html (zip of source)

Connections
The BV4618 requires 5V.
Here the I2C interface is being used in preference to the serial interface as this allows more than one device to be connected. The 7 bit address for this device by default is 0x31 but this can be changed by the user.

Connect the power lines last as the I2C mode is detected by the pull up resistors that are installed on the PRi
Software
The software is some very simple Python code. It is assumed that the Pi has been set up for I2C if not follow the instructions on this site. In addition the smbus module will need installing:
sudo apt-get install python-smbus
Get the python code and run the demo:
wget http://www.byvac.com/download/py/bv4618.py
python
import bv4618
bv4618.Demo()
The above should print Hello World on two lines. The code is simply a demonstration to show that this device is very easy to use.
User Contributions
Thank you Andreas for contributing this BasCom code. This is for use with ByPic
Thank you Jurg for contributing some Raspberry pi code (written in python) for using the keypad part of the BV4618, it uses the I2C interface. This can be easily extended to the display if required. The code is here.
Physical Dimensions
Current Version of Board.

FAQ
The display only prints text, what about numbers?
To print numbers they need to be converted to text, the best way of doing this is to use 'sprint' as follows.
char buf[30];
int value = 123;
sprintf(buf,"val %d, hex 0x%x",value,value);
di.puts(buf);
The output should be something like val 123, hex 0x7b
On my PIC system Nothing happens after the CR to initialise the Baud rate
When sending the first CR (byte 13) after reset, this establishes the Baud rate, however this takes some time and so a delay must be introduced before sending any other commands. A delay of about 500mS works fine.
On my Arduino I only get PRESS CR even when connected to I2C
The short answer to this is that the particular Adruino yu have does not have any pull up resistors on the SDA and SCL lines. Add the resistors to cure the problem.
Why?
There is a high value pull down resistor on the SDA line on the BV4618, when connected to an I2C bus the SDA line is pulled high (overcoming the high value pull down). At start up of the BV4618 the high value on the SDA is detected and the BV4618 switches to I2C mode and you get a different message from press CR.
Using serial the returned values are not what I expect
- As an example, when using the esc[k command the value returned is 0x30 when no key is pressed and something like 0x32,0x33,0x38 when a key has been pressed. The value expected was 0xEE so why 3 bytes?
This is because the value 0xEE has been coded into decimal ASCII so the value 0xEE is 238 in decimal which when coded into ASCII (see an ASCII table) is:
2 = 0x32
3 = 0x33
8 = 0x38
This will actually 'print' out if using a terminal as '238'. If using as part of a larger system then these bytes need to be converted into a single value.
How do I switch off the cursor there is no function for that in the Arduino library
The LCD itself is fitted with a HD44780 or similar controller and you can control this directly by sending it a command. It is this 'underlying' controller that holds the character set, moves and controls the cursor. You can directly control the H44780 by using the esc[E command or 0x1b 1 for I2C. A good description of the HD44780 can be found at [external link].
Here are some examples:
- Cursor off esc[12E
- Cursor block flashing esc[15E
- Cursor normal esc[14E
- Display off esc[8E
- Display on - any of the above cursor commands
BV4618 History
Firmware version 1.3 (December 2011)
This has an additional command (serial only) that will allow saving of the current contents of the screen as a sign on. The new command is esc[?27S
Firmware version 1.4 (Spring 2012)
New command sdded esc[e to bypass the BS,CR,LF,ESC charters so that custom and direct commands can be sent using the serial interface. This did not effect the I2C interface that could send these anyway.
Firmware version 1.8 (September 2013)
Various updates. The address is now stored in 3 places in EEPROM and a voting system is in place so that if one gets corrupted then it is corrected by the other 2.
You can save money on this item when you purchase several at a time. The table below shows the minimum quantities required to benefit from this offer, and how much they'll cost.
| Quantity | Price per unit |
|---|
| 1 | $44.15 |
| 10+ | $41.39 |